How to Set Up Payments in Shopify? A Step-by-Step Guide for Business Owners

Powered by an expert content team, this blog blends SEO precision with compelling storytelling. Every insight is supported by data-driven research, ensuring content that ranks, engages, and drives conversions.
Our authors are proven experts in their fields, writing on topics where they have demonstrated expertise. Every piece of content undergoes peer review and validation by industry professionals.
AI Summary
Key Highlights of Setting Up Payments in Shopify
This post explores how to set up payments in Shopify to ensure fast, secure checkout experiences that reduce cart abandonment. The key insight: optimizing payment setup boosts conversions and customer trust. It covers Shopify Payments—Shopify's built-in processor offering credit cards, mobile wallets, and Buy Now Pay Later options—plus third-party gateways and manual payment methods. Step-by-step instructions guide business owners through setup, verification, and activation processes. The blog highlights 2026 updates like improved fraud protection and faster payouts. Targeted at business owners and Shopify Plus users, it promises a streamlined, flexible payment system that improves checkout success and store revenue.
Imagine this: Businesses that consistently advertise and market their products build customer trust. But then, at the payment checkout page, if things slow down or don’t work right. Customers get frustrated and just leave the site and go elsewhere.
In 2026, Shopify Payments supports faster checkouts, built-in buy now pay later options, and advanced fraud protection. Proper setup helps reduce payment failures, avoid payout holds, and improve checkout conversions.
It is important to ensure the checkout process is smooth and fast for a successful purchase. The good news is, that Shopify Plus has complete control over customizing the checkout page. To keep everything running smoothly, you can follow a comprehensive Shopify Store Maintenance Checklist.
In this blog, we’ll guide you on how to set up payments in Shopify.
Payments in Shopify
Shopify provides several payment options, depending on the need the options can be chosen.
The top 9 payment methods in Shopify are
- Credit and debit cards
- Cash
- Mobile wallet
- Buy now, pay later (BNPL)
- Check
- Bank transfer
- Autopay
- Cryptocurrency
- Rewards or Gift card
Shopify offers three main ways to accept payments: Shopify Payments, Additional Payment Method (third-party payment gateway integration), and Manual Payment Method. Let’s see every payment option in detail.
1. Shopify Payments
Shopify Payments is a built-in processor that offers a convenient and secure way to accept major credit cards, popular mobile wallets (Apple Pay, Google Pay), and Buy Now, Pay Later (BNPL) options directly through Shopify. If payment is completed using Shopify Payments, the amount is deposited into the bank account based on the chosen payout schedule (daily, weekly, or monthly). The pay period also varies depending on the location. However, a drawback of using Shopify Payments is that it’s only available in a limited number of countries.
Payouts: Payouts transfer funds from a Shopify Payments account balance to a linked bank account.
Pay Period: The pay period in Shopify refers to the interval between when a sale is made and when the payout for that sale is received. It depends on the country that the store is based.
Note: The timestamp for capturing a customer’s payment is recorded in Coordinated Universal Time (UTC). Payments captured on Friday, Saturday, and Sunday are consolidated and sent as a single payment.
Step-by-Step Guide to Setting Up Shopify Payments in Shopify Plus
Shopify Payments uses Stripe to manage the payment process. Before setting up the Shopify payments there are some important points to keep in mind.
- The bank account must be located in the same country as the stores
- Shopify recommends enabling two-step authentication on the Shopify account before activating Shopify Payments.
- Shopify Payments charges transaction fees for each sale. These fees vary depending on the pricing plan and the type of payment (credit card, debit card, etc.)
Note: Payouts below $1, £1, or €1 (depending on the store currency) will not be processed immediately. These funds will be held and automatically added to the next payout that meets the minimum threshold.
Did You Know?
Shopify Payments charges a 1% fee for cross-border transactions in U.S. stores. This applies to all credit card purchases made with cards issued in countries other than the U.S.
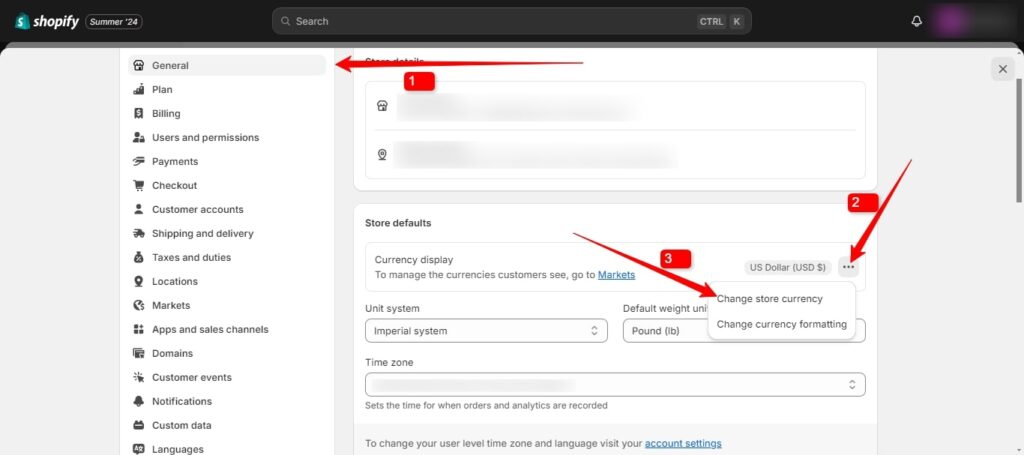
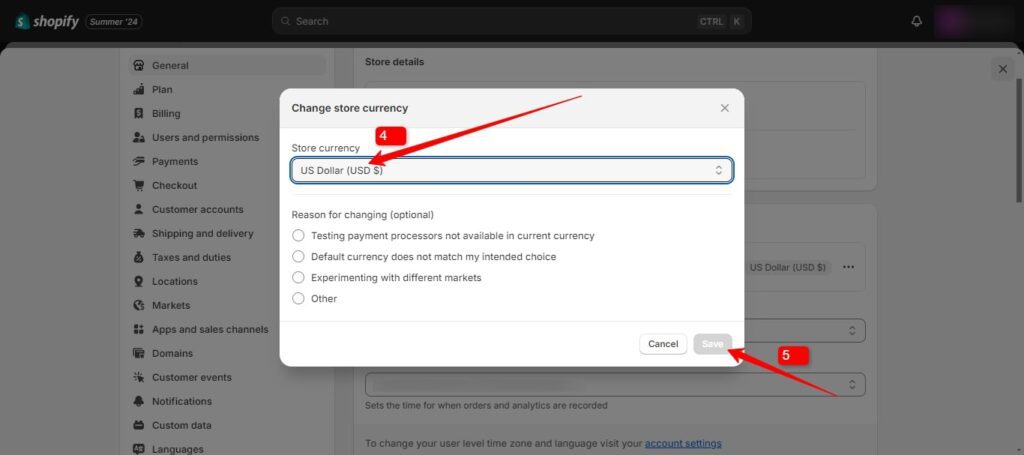
Step 1:
Before proceeding, establish the store currency. This can differ from a bank account’s currency. Changing the store currency after setup requires contacting Shopify Support.
Navigate to:
- Settings > General > Store defaults > Currency display
- Click on Change store currency and select the desired currency.
- Click Save to apply the changes.
Also Read
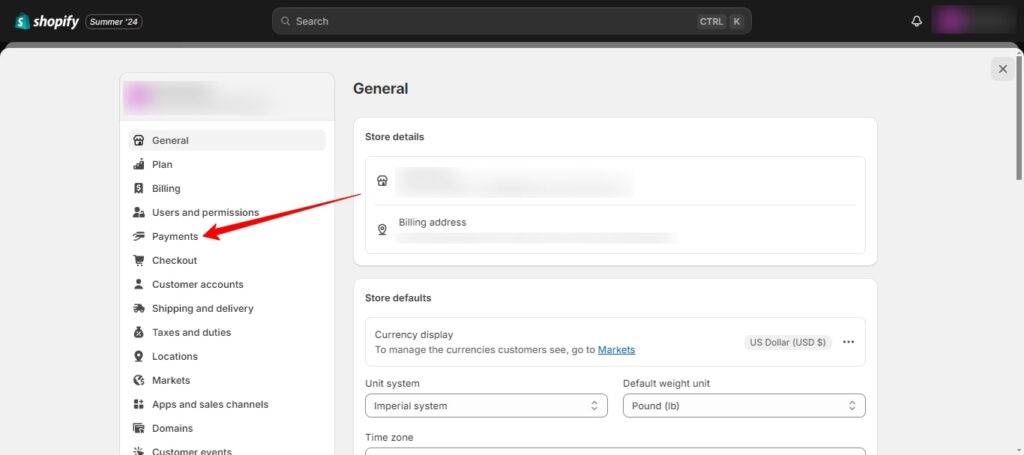
Step 2:
After fixing the currency again go to settings and select the payment option to set up the payment.
Note: It is mandatory to complete the Shopify Payments account setup within 21 days of the first sale. This includes entering the business details and banking information. For merchants in the European Union or Hong Kong, completing the Shopify Payments setup is mandatory to accept customer payments.
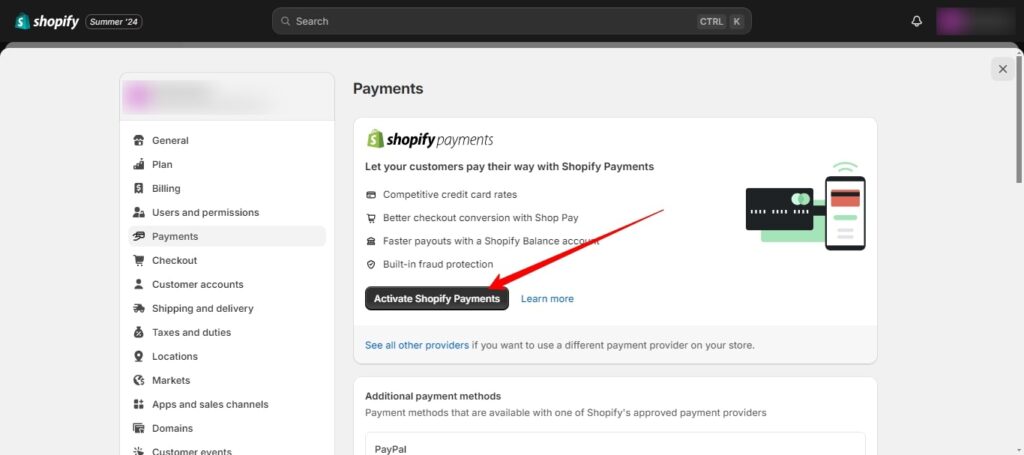
Step 3:
To activate Shopify Payments, click the activation button on the payment settings page. For those who have previously set up a different payment provider and wish to switch to Shopify Payments, an option is available to make this transition easy.
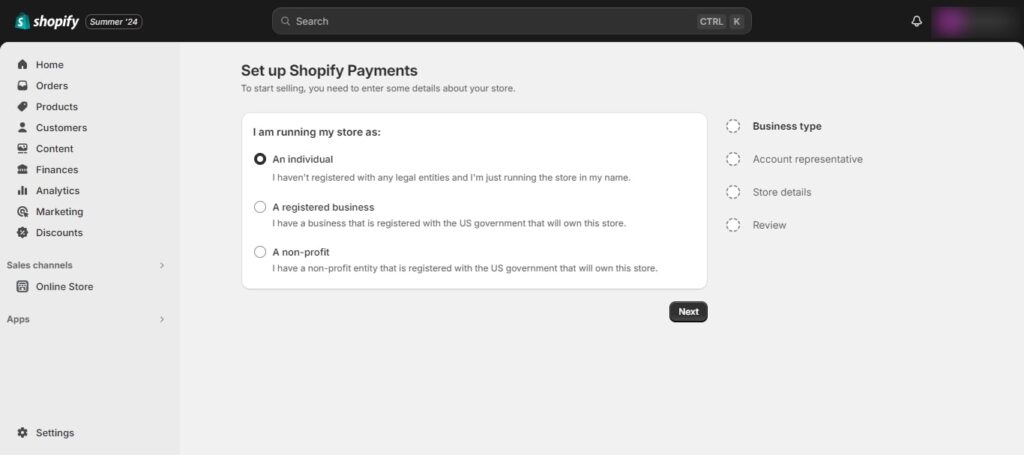
Step 4:
When activating Shopify Payments, it is important to specify the business type.
- Individual: This selection applies to sole proprietors who haven’t formally registered their business.
- Registered Business: This option is for businesses operating under a registered name, such as a corporation, LLC, or partnership.
- Non-Profit: This option is for organizations recognized as registered non-profit entities.
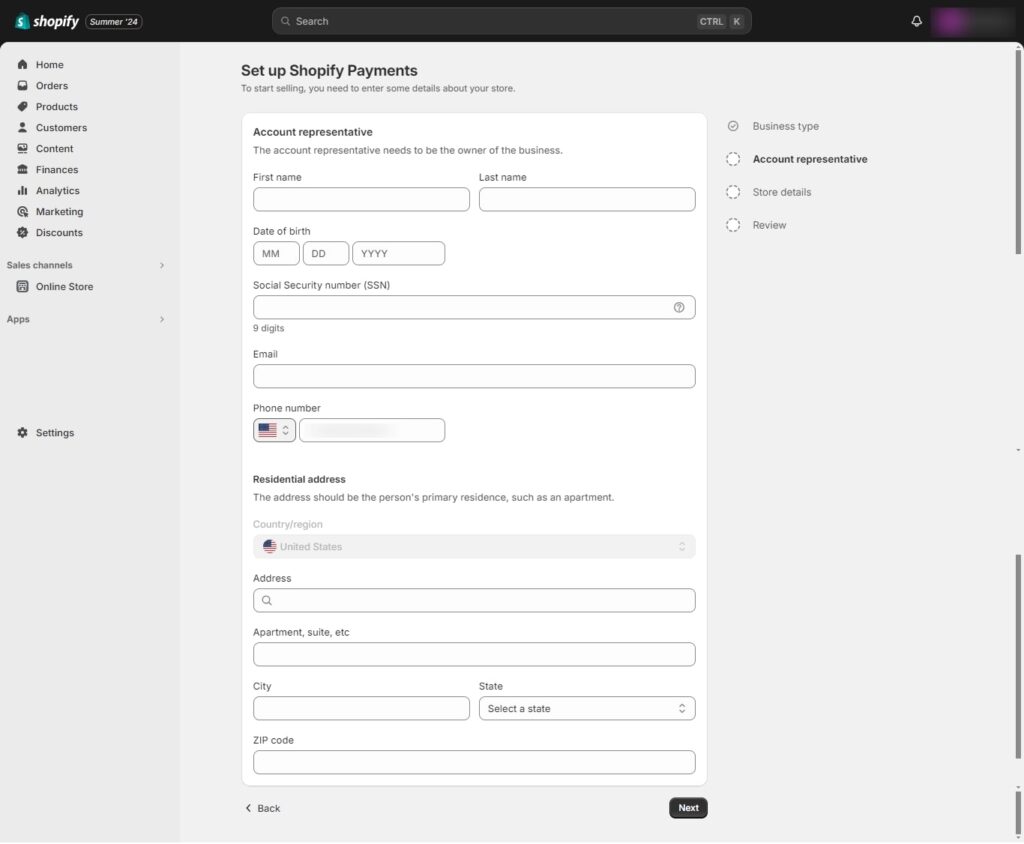
Step 5:
Shopify Payments requires an account representative during setup. This individual, often holding a position such as owner, senior executive, or director, possesses the authority and decision-making power within the business. The role of the account representative is crucial for the verification process with banking partners.
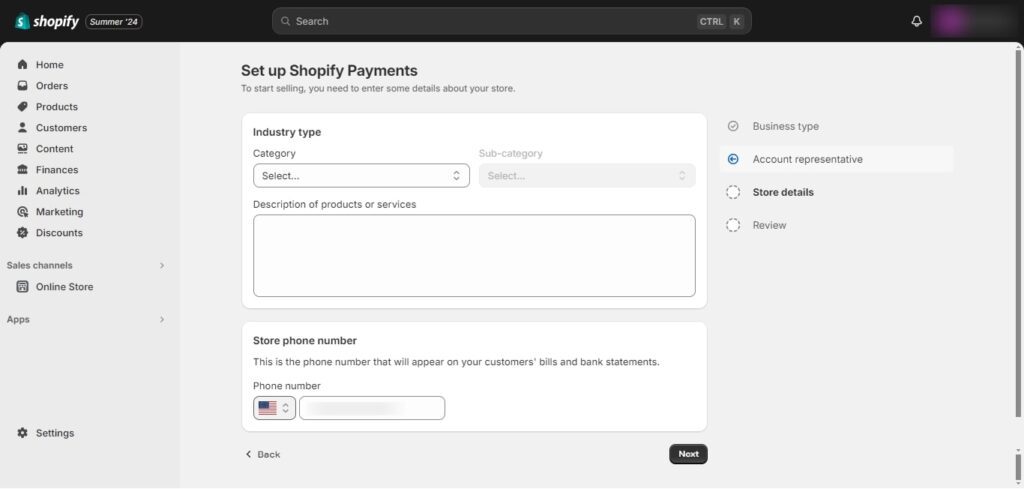
Step 6:
After entering the personal information during the Shopify Payments setup, it is necessary to provide the store details. Accurate and verifiable details are essential. If Shopify cannot verify the information during the signup process, they will request additional documentation.
The submitted documentation must include the business name, business address, and company registration number or VAT number.
Step 7:
After filling out the business and banking details, Shopify will review the request for Shopify Payments within 2-3 business days. This verification process ensures secure transactions.
Tip: Double-check all the information and have verification documents handy for the review to happen fast.
Also Read
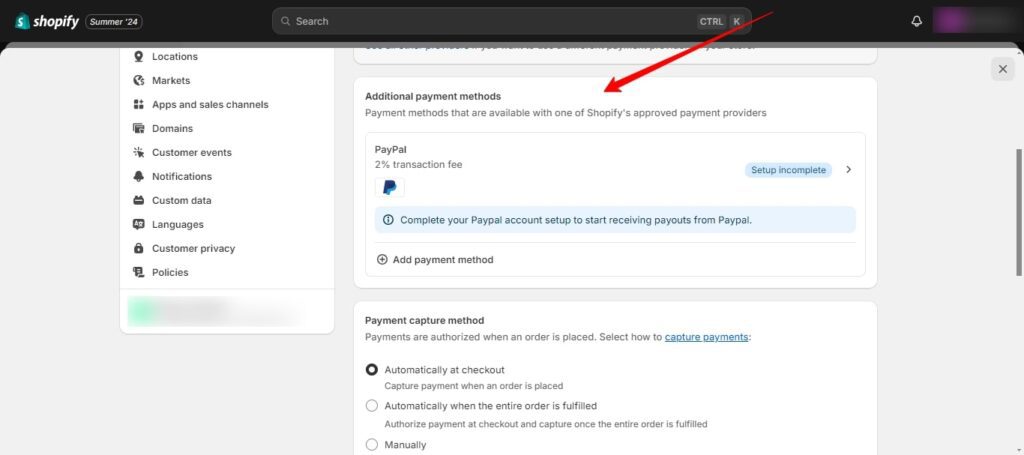
2. Additional Payment Method
Shopify allows integration with additional payment processors and apps. Shopify integrates with a wide range of third-party payment gateways, allowing you to offer popular payment options like credit cards, PayPal, and more. This method is preferred by merchants who operate from a country where Shopify Payment is not accepted.
Note: Each payment method or gateway might have its transaction fees. Make sure to Know every terms and conditions about the gateway before activating it.
Navigate to:
- Settings > Payments.
- Click on the Add payment method button.
- Choose the gateway provider to integrate. (e.g., Stripe, PayPal)
- Click Activate.
This is a third-party application, so it is requested to create an account using the email address that is linked to the Shopify account.
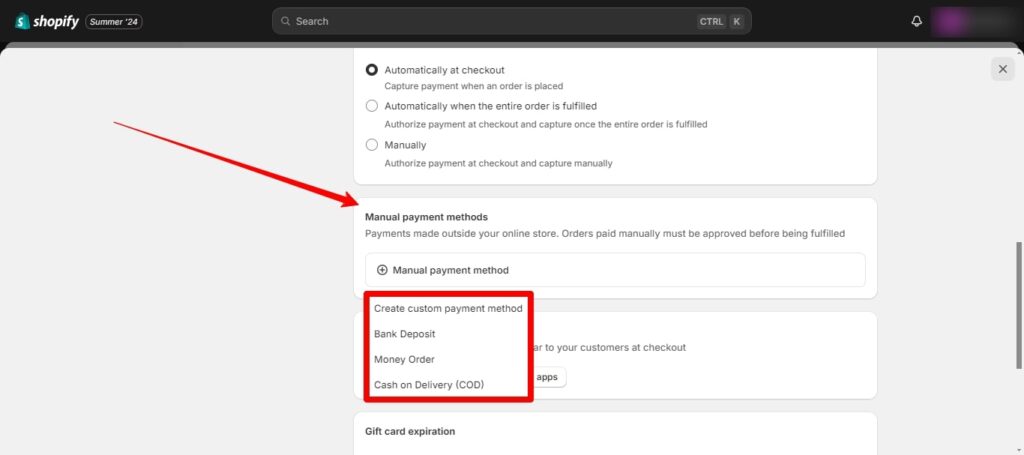
3. Manual Payment Method
Manual payment methods allow customers to place orders without immediate online payment. This can be useful for situations like phone orders, custom quotes, or cash on delivery (COD).
Navigation:
- Settings > Payments.
- In the Manual Payments section, click Manage.
- Options like Cash on Delivery, Pre payment, and Bank Deposit will be displayed.
- Click on the payment method to activate.
- Click Save.
Top Payment Gateways in Europe explores trusted solutions powering online transactions.
What’s New in Shopify Payments (2026)
- Built-in Buy Now Pay Later options like Shop Pay Installments
- Native Apple Pay and Google Pay support without third-party gateways
- Improved fraud analysis and 3D Secure authentication
- Faster payouts in supported regions
- Better integration with Shopify checkout and analytics
What If Shopify Payments Is Not Available in Your Country
- Shopify Payments is available only in selected regions
- If unavailable, merchants must use third-party payment gateways
- Features like multi-currency payouts and Shop Pay may be limited
- Popular alternatives include PayPal, Stripe, Razorpay, and local gateways
Wrap Up
In conclusion, Shopify helps to create a flexible payment system for the online store. It provides different choices from Shopify Payments (a built-in option for select countries) and integrates third-party gateways for wider payment options, or manual methods.
ColorWhistle is a leading eCommerce development agency offering a range of services to build and optimize your online store for success. To get expert assistance send a message or give us a call at +1 (919) 234-5140, and we’ll promptly respond to your inquiry.
What’s Next?
Now that you’ve had the chance to explore our blog, it’s time to take the next step and see what opportunities await!